Showing posts with label cornrows. Show all posts

Wednesday, February 22, 2012

Simple Cornrow Style: Half Up

It's been a while since I've done an actual style post. This is mostly because we've fallen back into our simple twists/twist out/repeat routine lately. I did finally find the time and motivation to do some cornrows, but somehow ended up doing one of the simplest cornrow styles in our aresenal.

One of these days, I'll get my creative juices flowing again! But until then, here's a simple one for ya:


The instructions for this style are probably explained simply by looking at the pictures. I first cornrowed the back half straight down. I then cornrowed the top half toward the center of her head and joined them with an ouchless band.

We were able to jazz this style up a bit by adding different colored flowers and other accessories to the pony on top each day.

*Sidenote: See how the ends of her cornrows are looking straight instead of curling up? That means a trim is long overdue. That will be happening very soon!

Wednesday, February 1, 2012

Twists and Cornrows to the Side


This style was pretty easy to do. First, I made a part that was slightly off-center. Then I added a handful of cornrows that went from her ear up to the part. There wasn't much rhyme or reason as to where the cornrow parts were made...I just started parting. The rest of her hair was then put into about 30 two strand twists.


Syd only wore her hair down like this once. The rest of the time, she wore the twists pulled into a low side ponytail (and sometimes wore a huge flower with it).

Excuse the black box. Her last name is on this shirt and we had to block that out. :)


If you 've been following us for any length of time, you can probably guess what happened next. After a couple days of the twists being in a side pony, the twists became a twist out. The twist out was then pulled into the same side ponytail.


We may have to revisit this style again soon. It is so versatile, being worn 3 different ways in one week. And if we change the size and parts of the cornrows, it will again have a completely different look!

Monday, January 30, 2012

Short Cornrows, Green Rubber Bands, and Two Strand Twists


After over three weeks of Syd's mini twists, I was ready to get back to some styling. Unfortunately, we didn't have a ton of time, so I had to pick something reasonably quick. I decided to do some short cornrows in the front, with some bright green elastic bands to make it fun. Then I just put the back into our staple...two strand twists.


After a few days with the twists in, Syd removed them to give herself a twist out for a couple more days. Here's how that looked just before the style came down.


This is an age appropriate style that is simple and easy, while still allowing for some variety as the twists become a twist out.

Thursday, December 15, 2011

Twists and Side Cornrows

We've been in a creative hairstyle slump lately. Life is hectic at this time of year, so we've been sticking with basic twists, twist outs, and ponytails. Here's an easy way to add a bit of interest to an otherwise simple twist style.

I did 6 cornrows halfway back on one side, secured them with lime green rubber bands, and twisted the remaining hair. It didn't take much time at all, but it was a nice change from the "boring" styles she's been wearing so often.


This style had a bit of staying power, as well. After the twists started looking fuzzy, we removed them and she had a twist out for a couple more days.


Relatively quick, easy (as long as you can cornrow), and lasted an entire school week. That makes it a winner in my book!

Sunday, October 2, 2011

Breast Cancer Awareness Style


I'm joining with some fellow bloggers this month to share styles that emphasize that October is Breast Cancer Awareness Month.

Before I explain how I did the style, I want to take just one minute to encourage all the ladies out there to PLEASE know your risk, remember to be aware of any changes in your breasts, and make sure you get your regular clinical breast exams. Breast cancer has affected multiple people in my family, and I can say with complete certainty that early detection and treatment is absolutely vital. If you're due to have a breast exam, don't put it off - call your doctor right away!

Quick fact: Did you know that it is recommended that women over the age of 20 are encouraged to have a clinical breast exam at least every 3 years? Woman over 40 should have one annually. Again, call your doctor if it's time for your exam.

And now...moving on to hair:

To do Syd's style, I first parted her hair from ear to ear and cornrowed the back straight down in about 10 cornrows.
I promise the part goes straight across...she was just sitting funny in the picture. :)

Next, I cornrowed a ribbon shape into the top section of hair. Then I just cornrowed the rest down away from the ribbon. The top half looked like this:

After the cornrows were done, I used my plastic craft needle to wrap the ribbon shape with a long pink ribbon. When I ran out of cornrow and got down to just the regular braid hanging down, I just wove the ribbon back and forth through the braid. Syd and I both love the results!

For more information about breast cancer, you can check out Susan G. Komen for the Cure, The National Cancer Institute, and the American Cancer Society.


Thursday, September 29, 2011

Quick Update: 2 Cornrows

Hi everyone! I apologize for my absence lately. We always have a lot going on and it's been even busier than usual around here: moving, sports, homework, etc. As a result, Syd hasn't been on the receiving end of very creative hairstyles. For the last week or so, she's just been rocking a couple of thick cornrows.

Not sure what's up with the lighting in this one


This is a great go-to style for us. Syd participates in cross country and has meets 3 days per week with practice on her off days. This means lots of sweat. We can take down the cornrows every other day, give her hair a quick wash or co-wash, and put them right back in. Quick, easy, and her hair is out of her face and off her neck, which are both important at this point.

The regular cross country season ends after next week. I promise to have some more creative styles after that! :)

Monday, September 19, 2011

Laced Cornrows and Box Braids

Syd had a big (40 schools!) cross country meet last weekend. She wanted something unique for her hair, and since she liked the way our last lacing style looked like laced up running shoes, I decided to go ahead and create another laced style.

I started by parting her hair from ear to ear and putting the front part of her hair into 8 cornrows.

I put the hair in the back into about a dozen big box braids. The parts weren't perfect or even, but Syd's hair is thick enough that the braids hid the imperfections.

I then used a plastic craft needle to weave some green and white ribbon (school colors) between two of the cornrows on each side of her head, much the same way that you would lace up a pair of sneakers.

The picture below shows which cornrows I used for the lacing. Each side had four cornrows, and I did the lacing between the second and third cornrows on each side.

Hair was laced up, time to do the same for the shoes.

When it drew closer to race time, we pulled all the braids back into a low ponytail to keep her hair off her neck.

And of course....I couldn't end this post without allowing Syd to show off her 3rd place medal. :)

Monday, September 5, 2011

Two French Braids

Syd wore her hair in various french braid styles for over a week. Here's the last one we did before washing her hair and changing to something completely different.

She still had that single cornrow along the front of her hairline (that one cornrow stayed like that for over a week and a half!). I left that alone and made a part down the center of her head. Then all I did was french braid each side and secure the ends with an ouchless band. Easy peasy!


After about two days, we removed the french braids. The braid out wasn't very defined, although these pictures seem to show more definition than there actually was (how does that happen?). The lack of definition was probably because I had only used moisturizer before braiding instead of using something with hold. Regardless, we threw her hair up into ponytail and went on our way for the day.


After this style, it was time for that front cornrow to finally come down and for her hair to get washed. Stay tuned for what came next!

Wednesday, August 10, 2011

Double Crossed Cornrow Style


Syd started cross country this week, so her hair needs to be in a style that won't be destroyed by a fair amount of sweat. So when I sat down to do her hair today, I knew I was going to do a cornrow style. Unfortunately, that was as far as my styling plan had gotten. While I pondered what kind of pattern I would do in the top half of Syd's hair, I made a part from ear to ear and put the back half into about 12 cornrows going straight down.


Moving on to the top section, I parted out enough hair for 4 cornrows in the center, and then I made a horizontal part across all 4 of those sections to divide them all in half. At this point, I was not cornrowing...I was only making the parts. I did this so I could make each cornrow cross over 2 other cornrows. I'm not sure how well I'm going to be able to explain this next part, so I added the picture below. Hopefully that will make it easier to understand instead of making it more complicated.


I cornrowed the hair in the top right section (D). When I reached the horizontal part, I made a few stitches without adding any hair and then moved over 2 sections to finish the cornrow with hair from section 2. So section D was joined with section 2, C with 1, B with 4, and A with 3.

Here's what it looked like when those crossover cornrows were finished:


After that, I cornrowed the sides in a pretty basic pattern and we were done.


All the braids can be pulled into a low ponytail every day while she's participating in cross country. No problem. :)

Tuesday, July 5, 2011

Y-Shaped Cornrows into a Ponytail of Twists


This style was done really quickly because it was prepped the night before. Here's how it went:

Syd washed her hair one evening after swimming. When she got out of the shower, I parted her hair into sections, added Shea Moisture Curl and Style Milk, and detangled each section. The time saver was parting her hair into the sections it would need to be in for the styling session the next morning. Once each section was detangled, I banded it and moved on to the next.

The following morning, I sat down to begin styling. And that's when I remembered to take a picture. LOL!


I was able to remove the ouchless bands, add a little more Curl and Style Milk, and immediately begin braiding one section at a time.

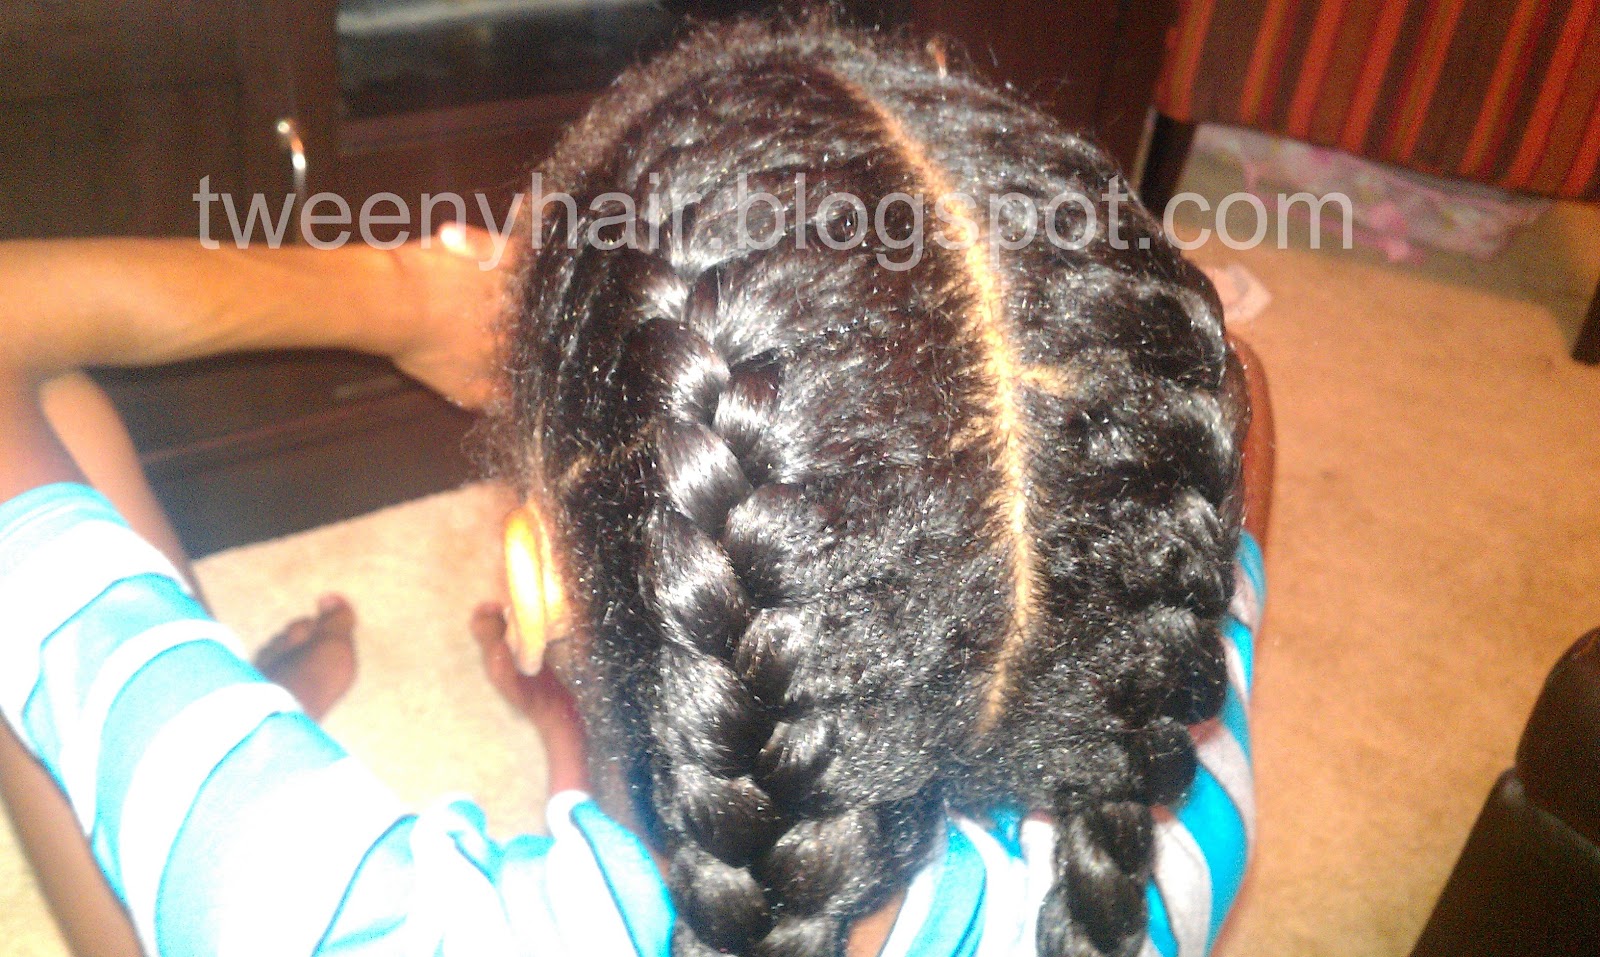
The back four sections were braided straight toward the center of her head, where all the parts intersect.


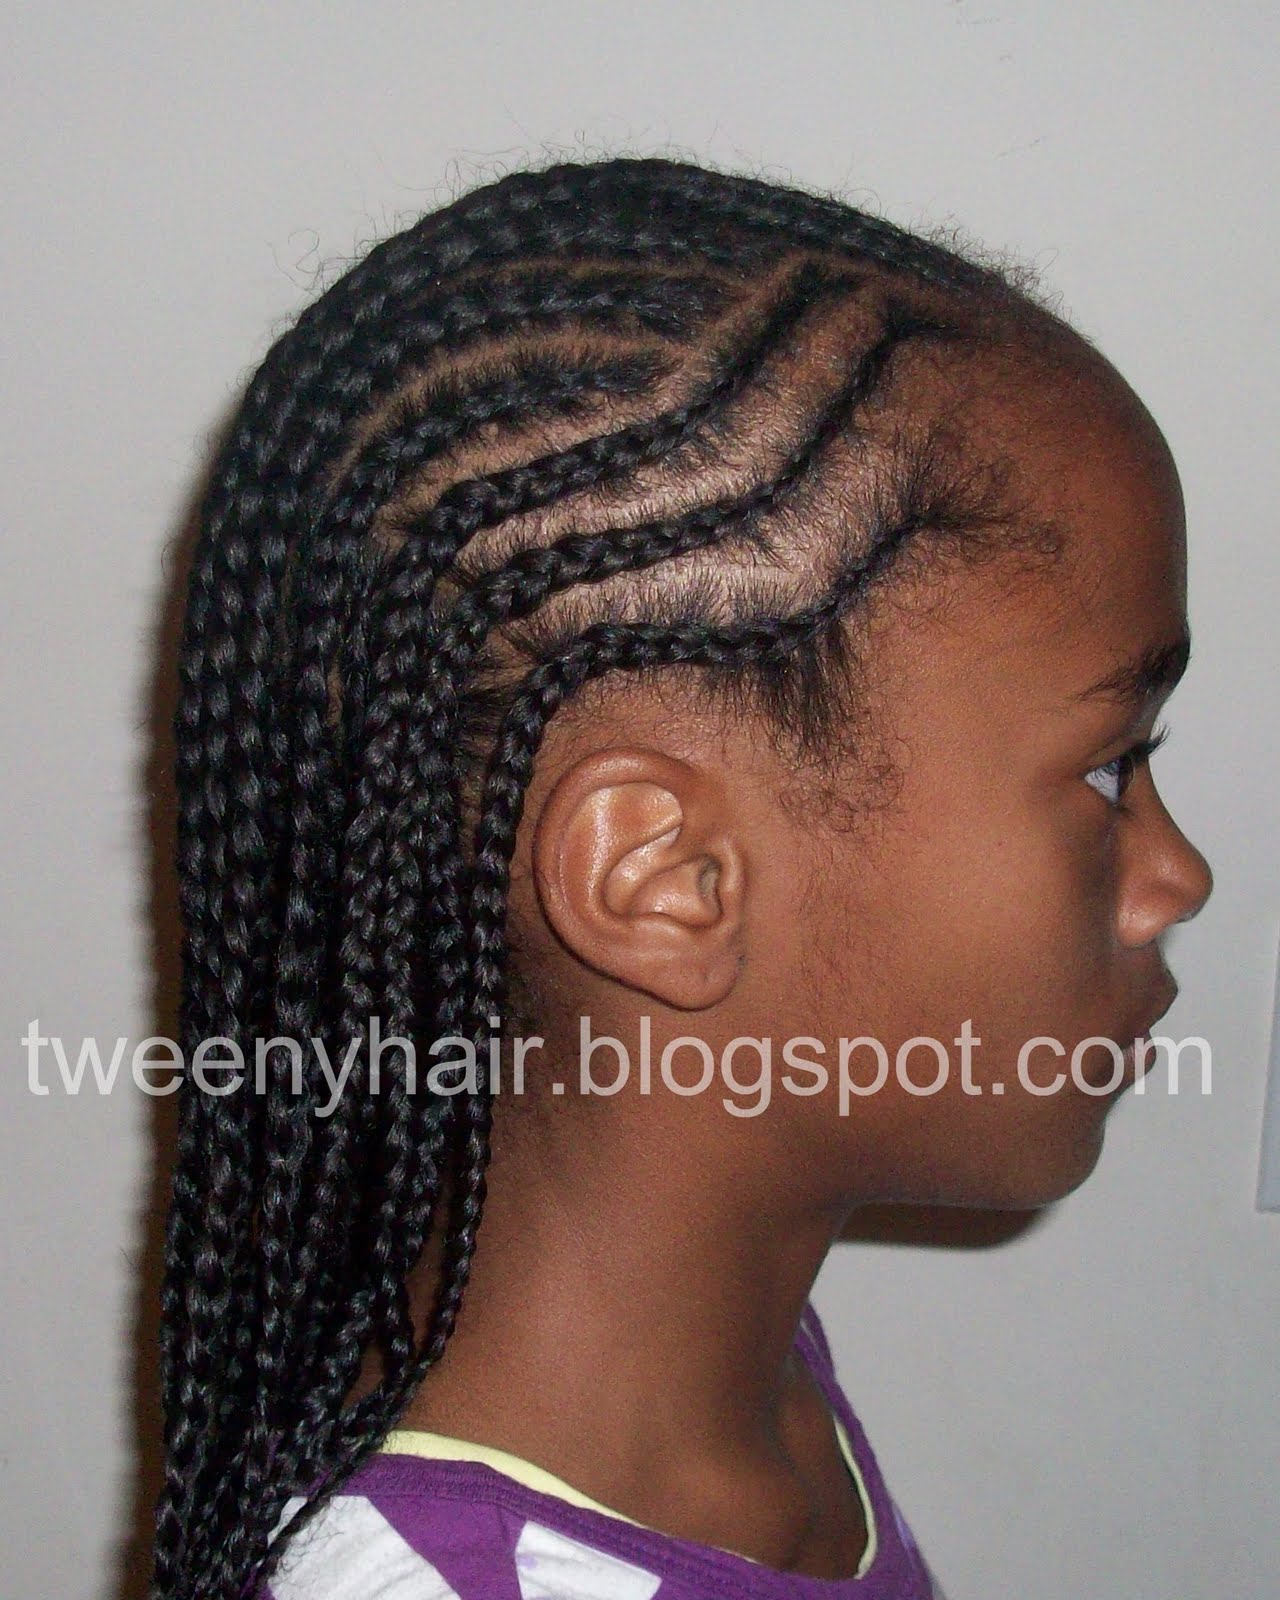
After these four cornrows were finished, I still had four sections in the front. I wanted to do something to add a bit of interest to the style, so I decided to make Y-shaped cornrows for these front sections. I began by splitting the triangle shaped section into 3 parts like this:


I cornrowed each of the two thinner sections, then combined them and used the third section to complete the Y shape.


I repeated that process on the three remaining sections.


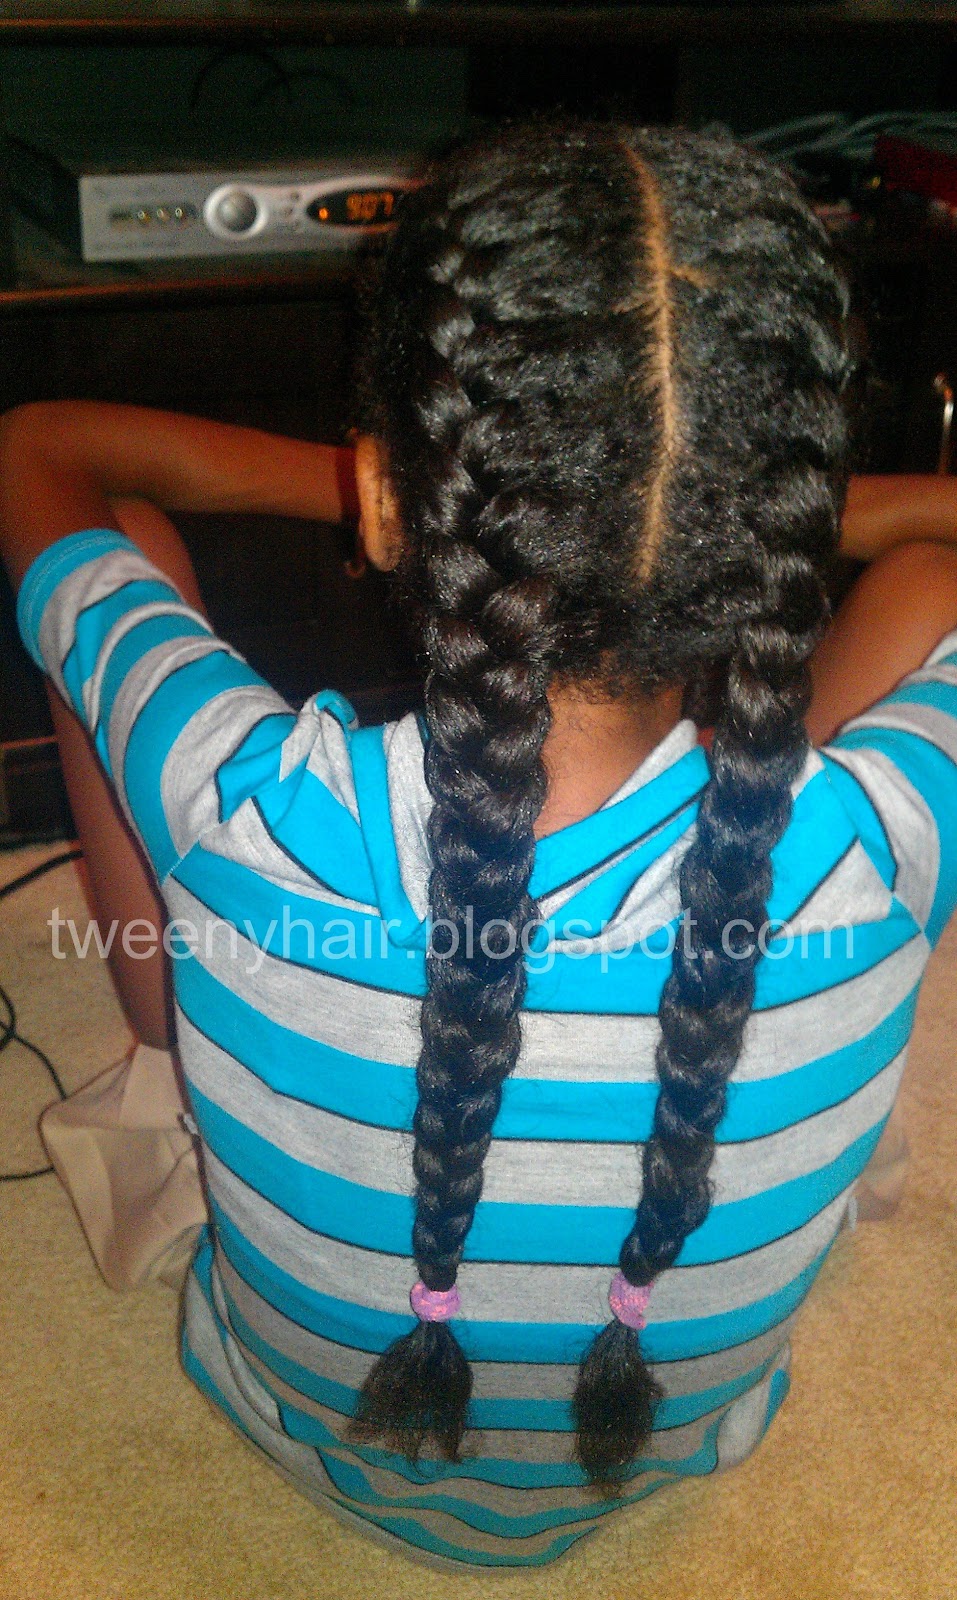
Once the cornrows were finished, I pulled them all into a ponytail. You can see in the picture above that there was just a bit of each braid at the base of the ponytail. I unraveled each braid one at a time and used the three sections of the braid to make three 2 strand twists. Less than an hour of styling and we were done.


A few days later, Syd's twists became a twist out. Her love for big hair is just unstoppable. Unfortunately, she played in the water again and that was the end of the twist out. I didn't get a picture of the twist out, but I did re-twist the ponytail to save the style. Knowing Syd, I'm sure there will be another twist out in the days to come.

LinkWithin

Related Posts Plugin for WordPress, Blogger...