Friday, April 29, 2011

Sharing the Spotlight: Mohawk by Malisia

Today the spotlight is on this mohawk style shared by Malisia.


Malisia writes:
"This is my daughter Coryn, aka Coco Puff.  For her fifth birthday I thought I would give her a cute yet funky hairstyle, so what better than a mohawk. I originally wanted to do cornrows leading into the mohawk but my braiding skills need some work and I knew cornrows would take hours.  So I opted for the veil pattern.  The style turned out just as cute and it only took me an hour to accomplish.  As you can tell from her diva pose she loved it."


This style looks wonderful and that pose shows how much Coryn is feeling it! Thanks for sharing, Malisia!

If you would like one of your styles featured on Sharing the Spotlight, click on Contribute at the top of the page to find out how!

Monday, April 25, 2011

Easter Style


Syd's Easter style didn't quite go as I had expected. To start with, I had an updo in mind, but our weekend was so busy I didn't have the time I would need to do it. I came up with something else that wouldn't take much time and got started.

I removed her cornrow style from last week, added some Bee Mine Luscious Moisturizer, and gently detangled to remove shed hair. Then I immediately moved on to starting the new style. Luckily it had only been six days since her last wash, so it was ok to skip that step for the sake of time.

First I parted out a circular section in the front of her hair and tied it out of the way.

Then I parted the back section down the middle and added five cornrows on each side. I moved from the sides toward the middle part, following the curved part from the top section.


I forgot to take a picture of it but at this point, I put two strand twists in the rest of her hair - the front, back, and ends of the cornrows. Then I was done for the night. My plan was to pin it up Easter morning into a really neat updo that existed in my head.

This is where the Easter style went wrong for the second time. When we woke up Easter morning, we discovered that our little container of bobby pins is MIA (how does that happen?). So I had a style that was halfway complete, no pins to finish it, and no time before church to do something different. After a split second of minor panic, I decided to put the back part in a flat twist up the center of her head. I left 2 twists out in the front and pulled the rest of the front twists back to meet the top of the flat twist. I used an ouchless ponytail holder to secure all the hair on top of her head.

Then I told Syd we are just going to let her hair fall where it wants, so I let go of all the hair and hoped for the best. Luckily, her hair was in a cooperative mood and ended up looking pretty good, even though it looked nothing like either of the styles I had previously envisioned.


We decided to keep these twists and cornrows in for the coming week. We just pulled all the hair back this morning into a ponytail. And the few cornrows on the sides gives the ponytail a bit of personality. The result - one happy tween. :)

Friday, April 22, 2011

Sharing the Spotlight: A Ponytail of Braids by DsMommy

This week's Sharing the Spotlight comes to us from DsMommy from untrainedhairmom.blogspot.com. She did a veil style all the way around daughter D's head and ended it with braids all pulled into a ponytail. I think the colored rubber bands add an extra touch of Spring, as well. Thank you to Brooke for sharing this adorable style!


Don't forget to swing by Untrained Hair Mom to see more from DsMommy!

If you would like one of your styles to be featured on Sharing the Spotlight, simply click on Contribute at the top of the page to get all the details!

Monday, April 18, 2011

Woven and Criss Cross Cornrows


Ok, this post is going to have a lot of pictures because I'm just not too good at explaining what I'm doing. It's easier for me to just show you...and hopefully that will be more helpful for you, as well. :)

To start this style, I parted Syd's hair from ear to ear and cornrowed the back half of her hair straight down.

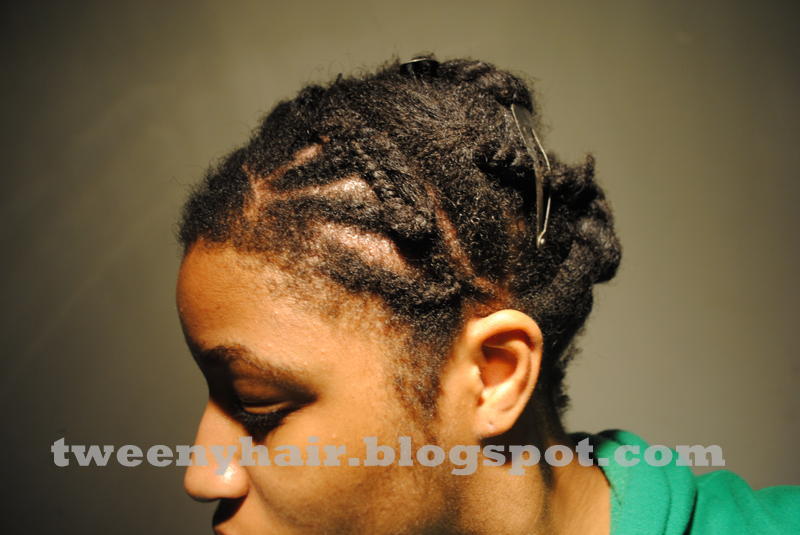
After this, I parted out a large square on the top of her head. I put a cornrow straight across the front and tied both sides out of the way for now.

I parted out a triangle in the front left corner of this square. I didn't do anything with this triangle yet - I just tied it out of the way until later.

Then I made a cornrow next to that triangle. After that cornrow, I parted out another strip of hair and tied it out of the way until later.

I continued this pattern as I moved diagonally from the front left to the back right corner of the square. You are basically making parallel parts but only cornrowing every other section of hair. I had 4 cornrows and 5 strips of loose hair when I finished.

Next I moved to the front right corner of the square. I parted the hair (moving over the previously made cornrows) to make a cornrow that crosses over the cornrows that were already there.

I did the same thing next to the cornrow I just made. You will have a strip of hair that has a few cornrows running through it. Cornrow the strip of hair you just parted out. When you move over the earlier cornrows, you'll have to do a couple stitches where you don't add any hair.

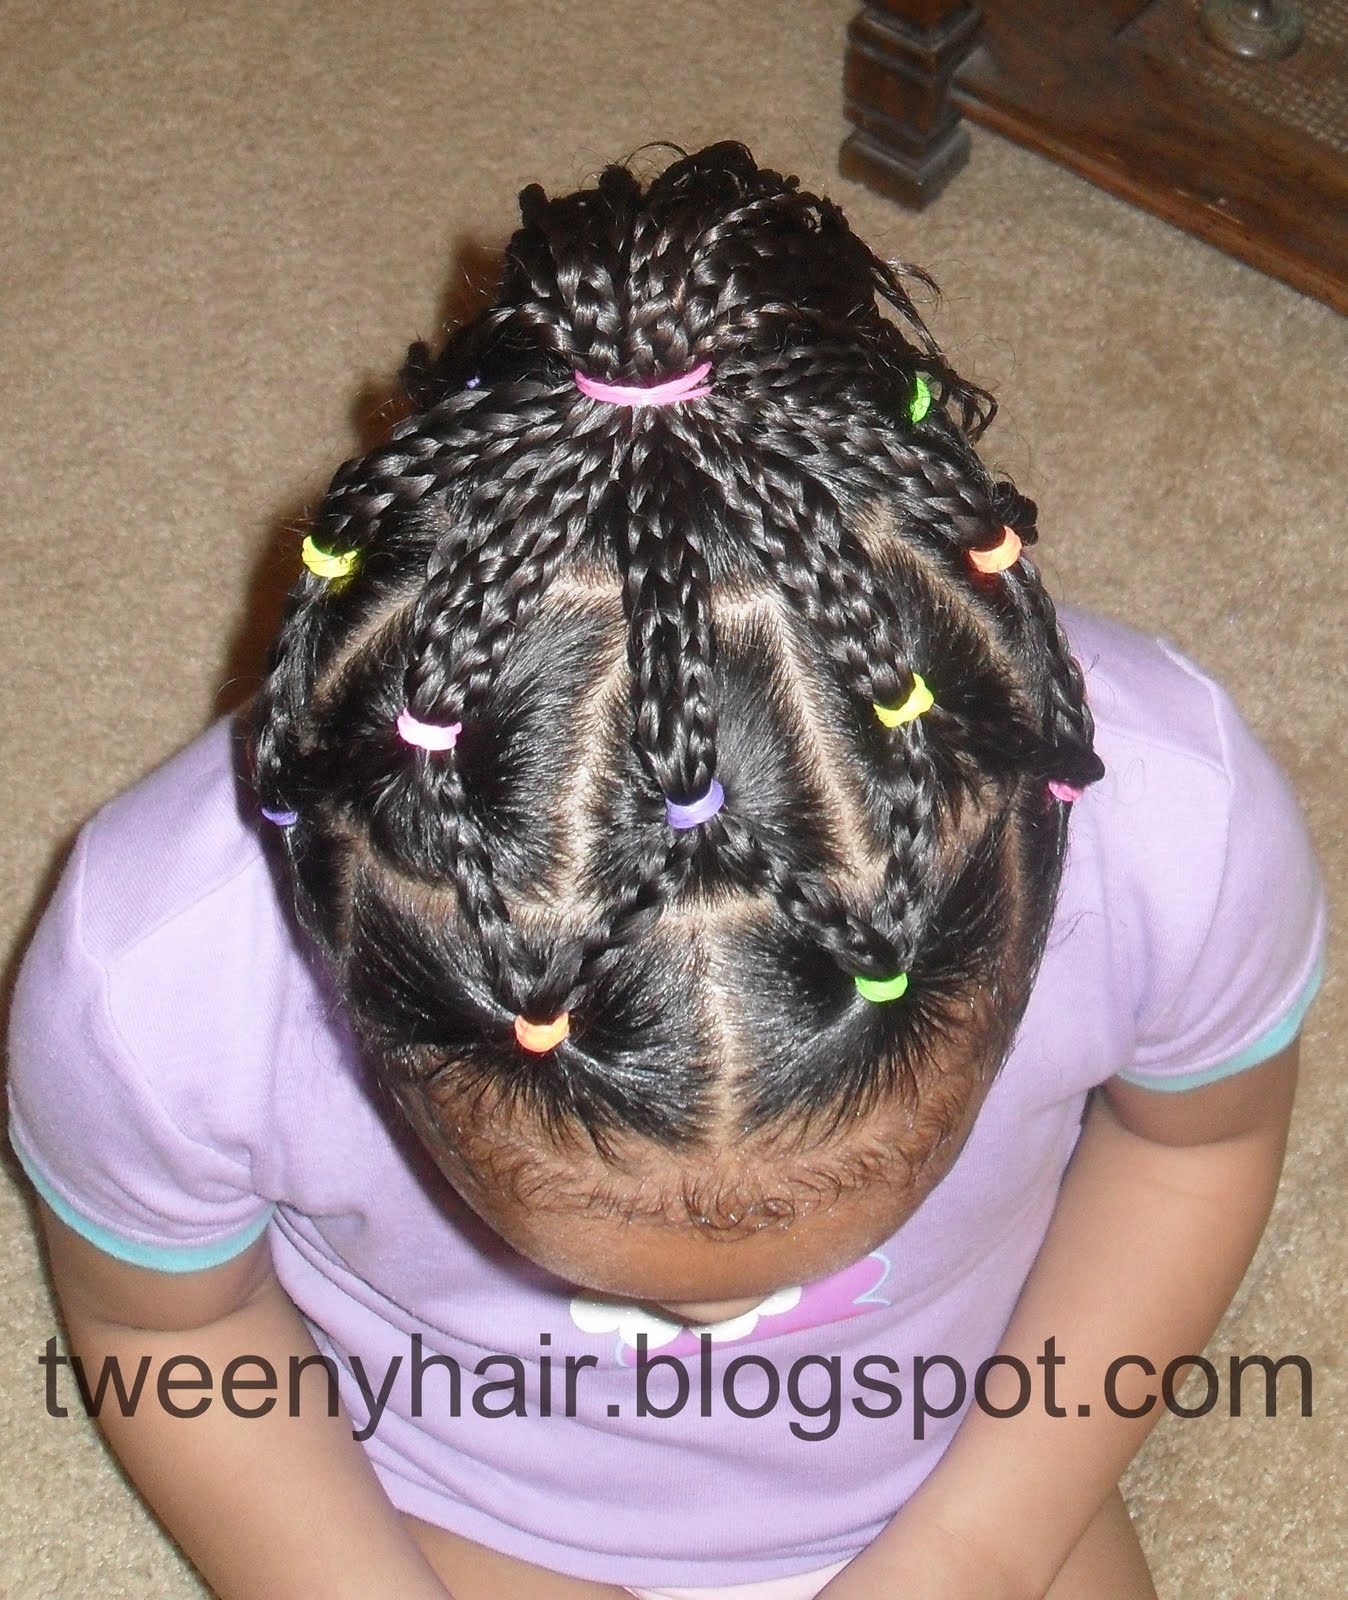
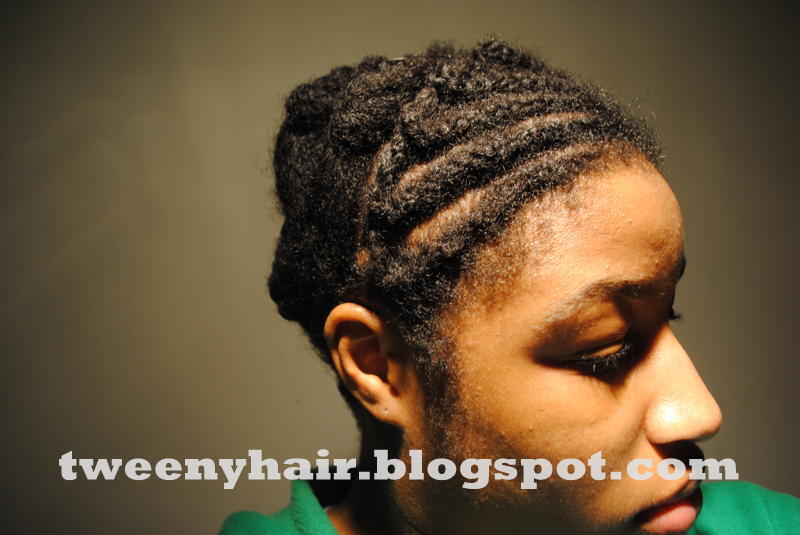
When you've moved all the way to the back of the square, you should have a pattern that looks like this:

Now it's time to move over to those side sections. This is the shape of the section of hair I was left with after I made the square.

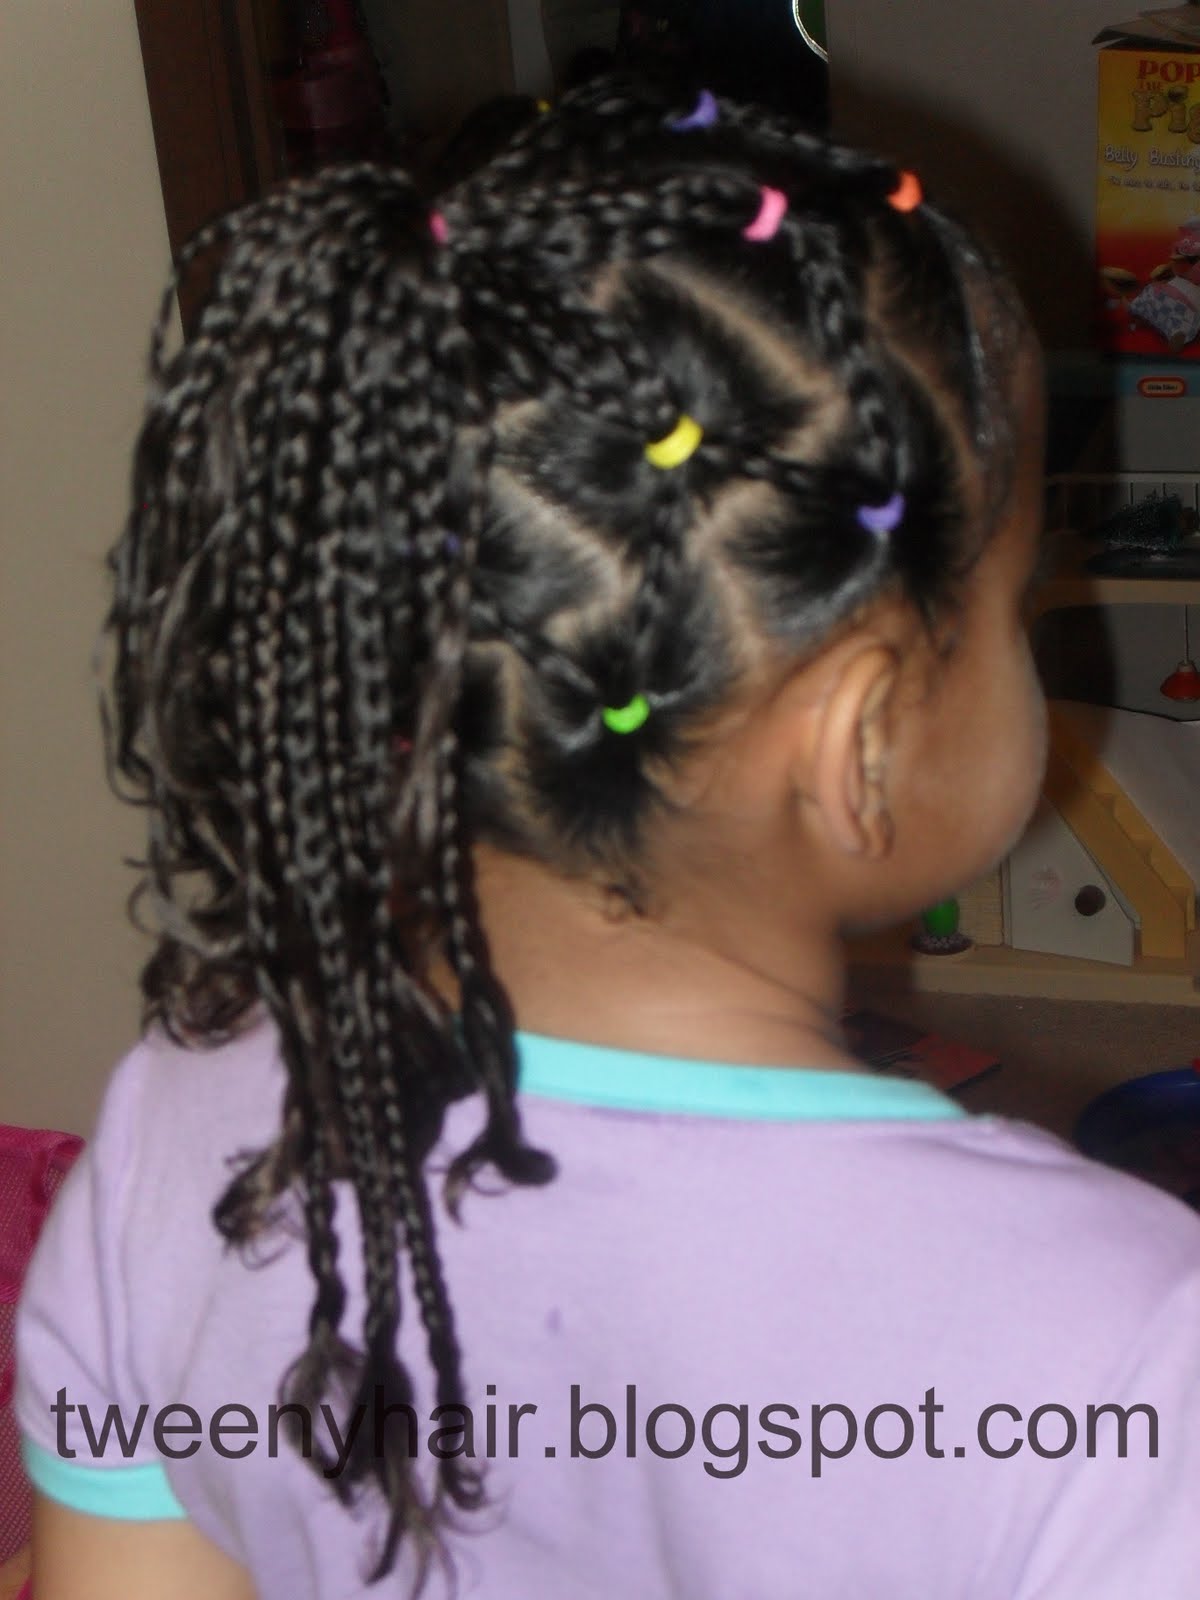
I wanted to do two criss cross cornrows on each side, so I split this section in fourths, parting in half horizontally and then vertically.

Then I cornrowed the section on the top left, and when I got to the center I moved to the section of hair on the lower right. Repeat, this time moving from the section on the bottom left up to the top right.


Repeat that with the hair on the other side and you're done!


Friday, April 15, 2011

Sharing the Spotlight: Pretty Updo by Devany

Devany from pelo-bonita.blogspot.com sent in this shot of a updo she did. She got this look by gathering her hair in back and randomly rolling and tucking until it was all up against her head. She used bobby pins to hold in all in place and then added the pretty flower clip. I love the way it turned out! Thanks for sharing, Devany!


If you would like to see one of your styles featured on Sharing the Spotlight, click on Contribute at the top of the page and get all the details.

Thursday, April 14, 2011

Twists, Braids, and Outs

Syd and I have had a full, hectic schedule lately. On the rare occasion that we get a few hours at home to relax, we'd rather sit down with a game of Uno or go for a bike ride than spend all of our free time on hair. As a result, we've been quickly putting Syd's hair into thick braids or twists at night and letting her wear the braids for a couple days, and the resulting "out" afterward.

Here's a look at her hair for the past week:

For the picture below, we had just put Syd's hair into about 10 thick two strand twists the night before. They didn't dry all the way through, so we knew the twist out was going to be fluffy and big. I put a flat twist along her hairline and pulled it back to join the rest of the hair in a fluffy ponytail.

That night, I put thick cornrows in Syd's hair. I parted the hair so I could do 5 cornrows, but I decided to split the 3 middle ones in half and turn each section of hair into 2 cornrows. That way, all the cornrows ended up being about the same size.
These braids could have lasted several more days, but we removed them after a day because Syd wanted the braid out. Here's the braid out after being in a low ponytail all day at school.

Next, we did the cornrow style below. I gave her a braided headband first, and then braided the rest of the hair into a ponytail. It looks really fuzzy in the picture because she had worn it for a couple days and I forgot to take a picture of it until right before I took the braids down. If you look closely, you can even see that I had already removed the ponytail holder!
This morning, I took out the cornrows that formed the ponytail and left the braided headband in. Here is that braid out.
Don't mind the crazy eyes in that last picture. I wanted to show you what it looks like with the headband still in from the front. We'll probably just pull the back into a ponytail tomorrow. And I may or may not do a more long-term style this weekend. We'll see!

Oh, and I had to share this just-for-fun picture of Syd on the last day of her side cornrow style. She was wearing a dress and had some quarters but no pockets to put them in. This was the solution she came up with. She's so funny (but very resourceful)!

Wednesday, April 13, 2011

Dealing With Different Curl Patterns

Most of you probably know that Syd loves big hair. Wash-n-go styles make her a happy girl because that's when her hair is the biggest. However, that is also one of the hardest styles for us to get looking good because of the variety of curl patterns on her head. I have spoken to a few people who said they chose to relax their hair because of this very thing.

When taking a picture of the big hair for this post last week, I took the picture below, too. Syd was making a weird face so I almost deleted it, but then I realized how visible her different curl patterns are. I know I have talked about this before, but this might help show what I'm talking about.


The hair on the sides of Syd's head curls up much more loosely than the rest of her hair. There's only a small amount of hair with the looser curl pattern and it just lays on top of the tighter curls. This used to drive me crazy (and sometimes it still does) because it means the hair in the back curls up much more tightly and appears shorter than the sides.

Because of this, we have learned to adjust the amount of product we use on the different sections. The sides don't require near as much product. If we didn't use less on the sides, those parts of her hair would be weighed down and appear lifeless. I also keep thinking about having the sides of her hair cut shorter than the rest to help even things out, but I haven't done that yet.

Another method you can use to deal with different curl patterns is to stick with twist outs, braid outs, and roller sets. This helps give all the hair a more uniform look. We don't use this method as often anymore, but that's mostly because of Syd's growing love for big, voluminous hair.

I know most curly-headed people don't have uniform curls all over their heads, but some heads have more varied curls than others. There is always a way to work with your hair without reaching for chemicals or heat. Play around and embrace those curls - all sizes of them!

Monday, April 11, 2011

We Have A Winner!

Actually, we have two winners. :)

The winner of three 8 oz Bee Mine products of your choice is...


And the winner of three 2 oz products of your choice is...


Congratulations Demetra and Revelle! Email me at tweenyhair@gmail.com as soon as possible for details about how to claim your prizes.

Friday, April 8, 2011

Sharing the Spotlight: Sun Ray Braids by Precious

This week's Sharing the Spotlight style was done by Precious from precious-curls.blogspot.com. She put the front of her hair in cornrows that are in a sun ray pattern. I've also heard this pattern called sunburst. She then twisted the ends of all the cornrows together to form sort of a headband look. I think I'll definitely be trying this on Syd's hair in the future.


Precious features this style on her blog. Click here to see the style, more pictures, and the detailed instructions she provides. Thanks for sharing, Precious!


Do you want to see one of your styles featured on Sharing the Spotlight? Learn how by clicking on "Contribute" at the top of the page.

Wednesday, April 6, 2011

Side Cornrows and Medium Box Braids


When I asked Syd what kind of style she wanted, she said she wanted something with cornrows. But have you ever had one of those days where your fingers just don't cooperate? I have those days from time to time, and this was one of those days. I decided that I would give Syd the cornrows she wanted, but only a few of them.

Was this cheating? Perhaps. But that's what I did. :)

I convinced my fingers to put a few cornrows in the front right section of her hair, starting the cornrows just above her ear and moving toward a part in the center of her head.


Then I put the rest of Syd's hair into medium-sized box braids. I used a brick pattern when parting out the boxes so most of the parts are hidden by the braids hanging down. We didn't use rubber bands at the bases or ends of the braids.


Syd loves the side cornrows. It's just a few braids, but they really give a basic box braid style a completely different look. Maybe my fingers will be more cooperative next week and Syd can have the cornrow style we had planned.


Pleather pants and lip gloss...moments like this remind me that my baby isn't a baby anymore. (sigh)

Monday, April 4, 2011

"She's Old Enough For A Relaxer"

Now you all know I didn't say that...but it was said to me. Here's the story:

After wearing her hair in small twists for a couple weeks, Syd was anxious to see her beloved "big hair" again. When taking the style out, I wet her hair and added a lot of Kinky Curly Knot Today. Once all the twists were out, we were left with hair that looked very similar to (but not exactly like) a wash-n-go. It was big and Syd loved it. I told her she could let her curls fly freely all weekend, knowing that she didn't have school on Monday and we'd style it that day.

This is what her hair looked like all weekend: big, but moisturized and healthy.
We had a busy weekend. We spent time shopping, at church, and at the park. Syd got compliments on her hair everywhere we went. She also got looks from people who obviously weren't fans of such huge hair. I think that's why Syd loves wearing her hair like this. Love it or hate it, people DO notice hair that big.

We can usually tell when someone doesn't like the mass of curls on Syd's head. Their facial expressions make that obvious. But the only actual comments we've ever received have been positive. I guess a lot of people in our area follow that golden rule: If you don't have anything nice to say, don't say anything at all. But this weekend, one woman in particular didn't follow that rule.

We were hanging out having a good time when this woman looked at me and said, "You know, she's old enough for a relaxer."

I looked at this woman and said something to the effect of, "Yes. She's old enough. But I don't plan on destroying her hair just to try to help her fit in with people who don't love her the way she is." She didn't really have a response for that, so the encounter was over.

Not everyone is going to appreciate the beauty Syd and I see in a head full of loose curls. I get that. And I completely accept that. After all, we all have our own opinions and preferences. But since when is it appropriate to suggest to a parent that they alter their child's appearance? Actually, I know the answer to that question: IT'S NOT!

What about you? Have you ever been on the receiving end of this type of comment? How did you handle it?

LinkWithin

Related Posts Plugin for WordPress, Blogger...