

Tweens and teens often find themselves somewhere between wanting to fit in and wanting to confidently embrace their own identities. So what happens when that naturally curly head of hair is suddenly too old for bows and barrettes, but not yet in need of professional adult styles? Step away from the relaxers and join us as we explore natural hairstyles that find the balance between individuality and the desire to fit in.
Wednesday, November 9, 2011
Tuesday, November 8, 2011
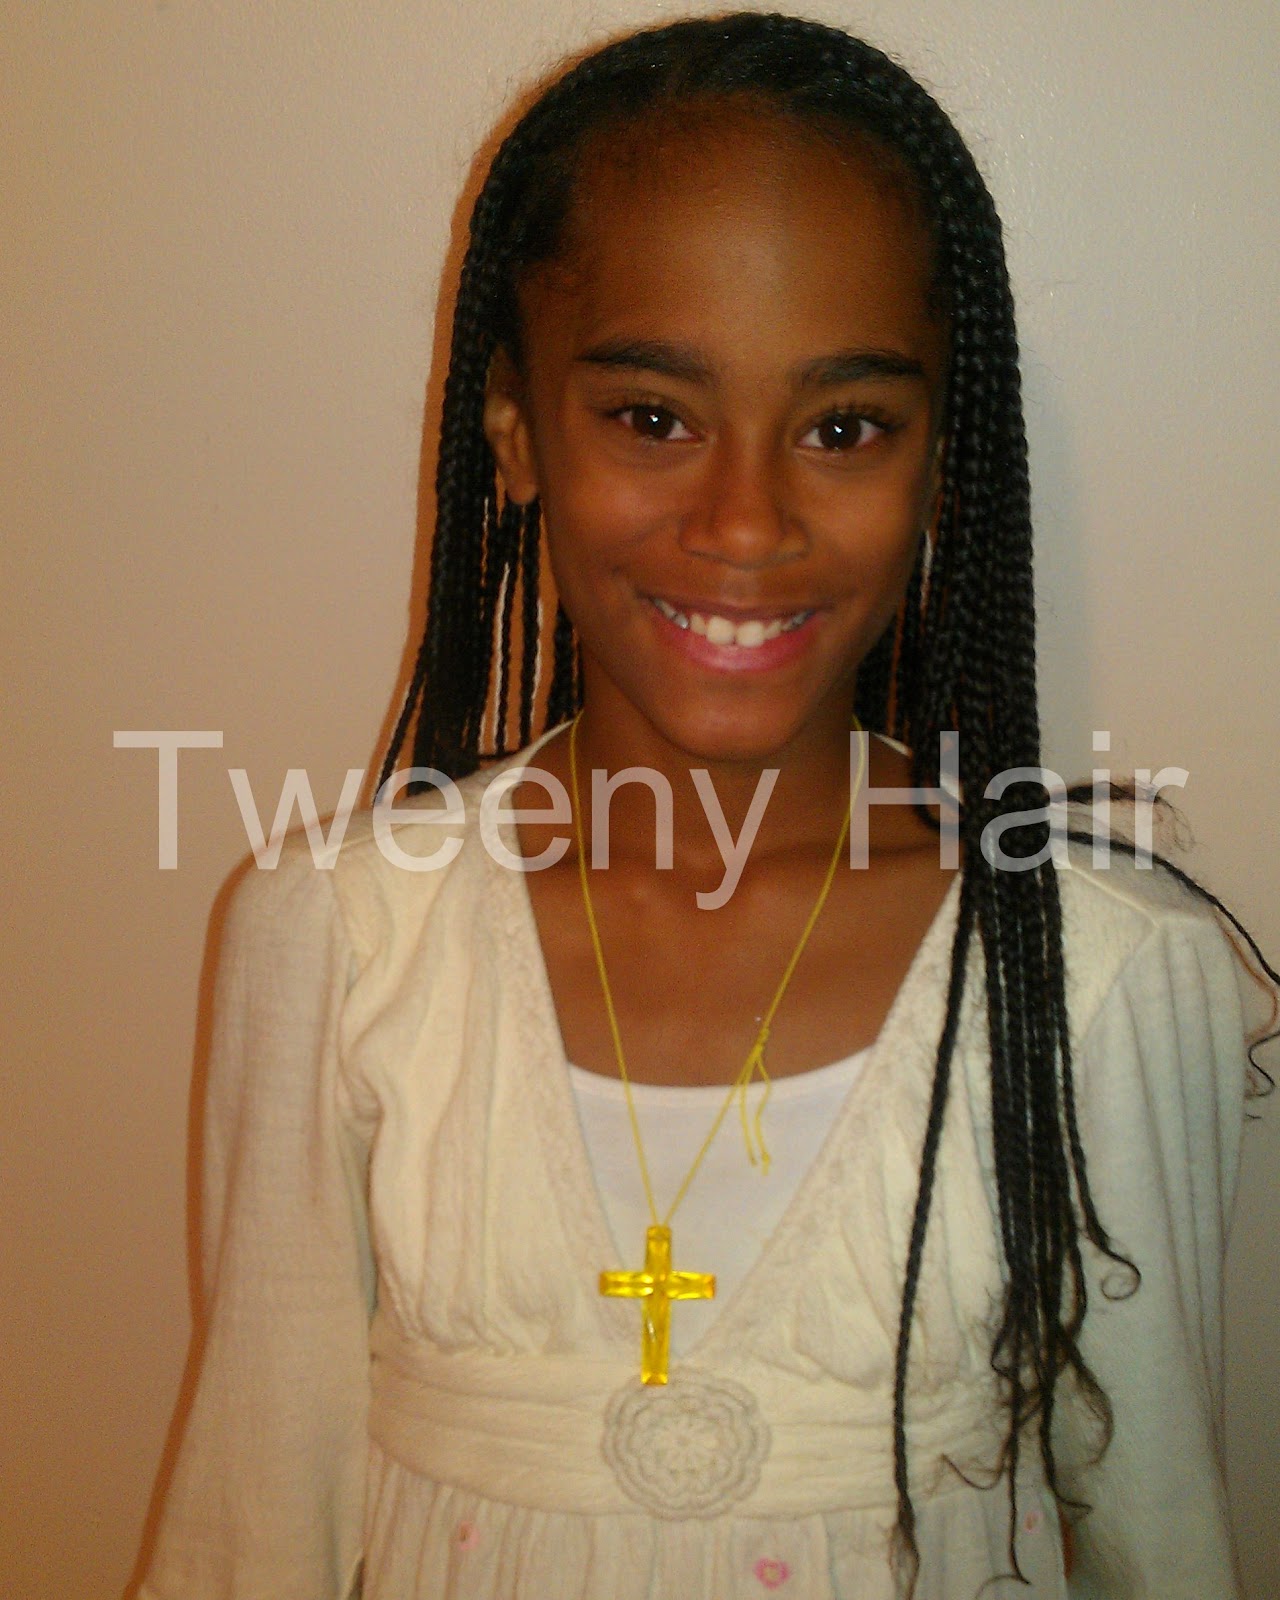
Sharing the Spotlight: Cornrow Style from Mainly Braids
Today's spotlight is shining on this amazing cornrow style from Mainly Braids. Mommy Shay did the style on daughter A, and I love the design. I think I might have to snag this style for Syd's head at some point. Check it out!


 If you're not a follower of Mainly Braids, I highly recommend heading over there and clicking that follow button. Her styles are creative and range from quick and easy to more complex and time consuming. An extra bonus? She even posts meal plans and recipes! How great is that?!? Be sure to check it out!
I love sharing the spotlight, but I need help from you readers. If you have a style that you would like to share, please send it in so the spotlight can shine on you! Click on Contribute at the top of the page for more details.


I love sharing the spotlight, but I need help from you readers. If you have a style that you would like to share, please send it in so the spotlight can shine on you! Click on Contribute at the top of the page for more details.
Sunday, November 6, 2011
Box Braids
Since I haven't been physically well lately, I haven't been up to spending much (or any) time doing hair. As a result, Syd's hair has been in a twists-twist out-repeat cycle. Today I was finally feeling a little better, so I decided to end that cycle.

We opted to do some box braids, which I'm hoping will last until my health is back at 100%. The braids are also a good choice for right now because the weather here is supposed to be colder, rainy, and windy for a while. Box braids hold up better than most other styles in weather like that.
I started by moisturizing her hair with Curls Creme Brule and then banding it with ouchless bands overnight. Yes, the parts are crazy, but I only used my fingers since I knew the bands were coming out in the morning.

When the bands came down in the morning, we had to leave for church so I put her hair into one big braid. And then I forgot to take a picture of it. Sigh.
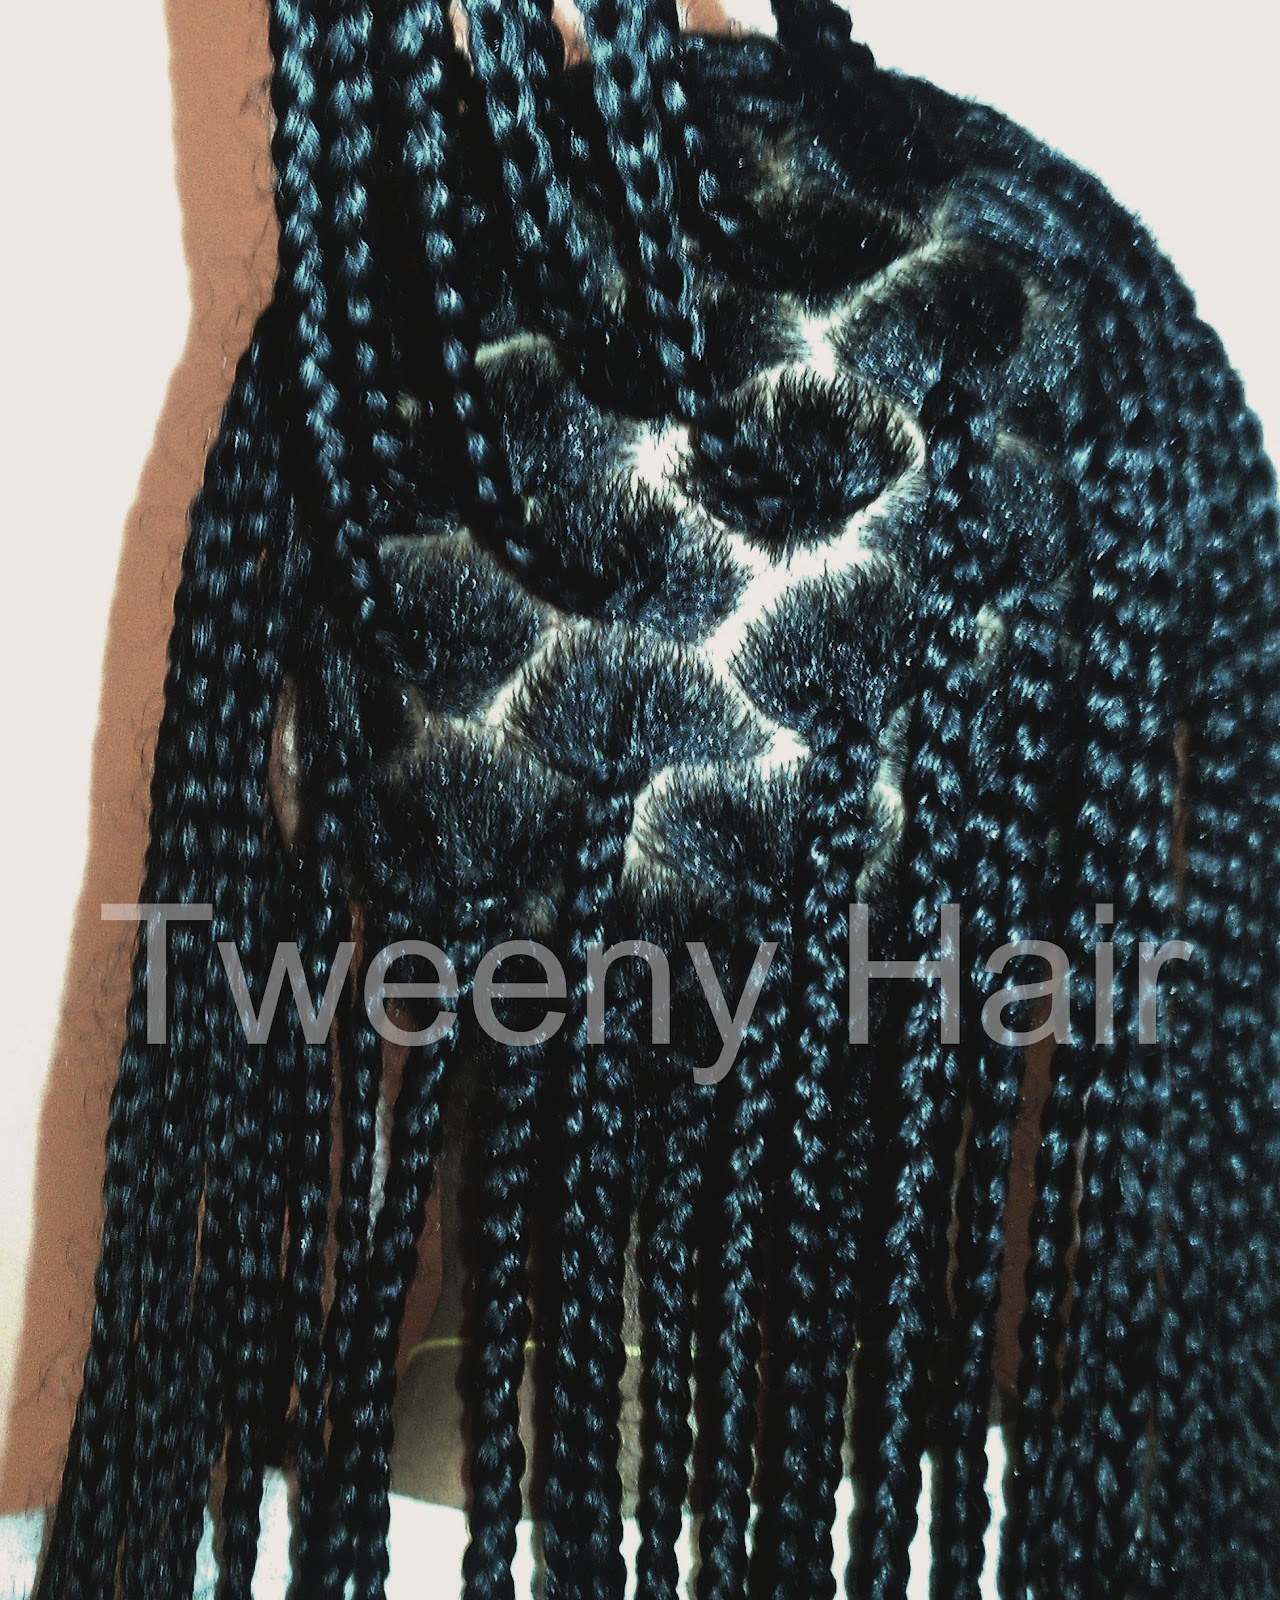
When it came time to start the box braids, I started at the back and made my usual crescent shaped parts for her braids. You can click here to see a post that explains this parting method.

When I got to the top, I added a slightly angled side part. This disrupts the uniform crescent shaped parts, but I'm never worried about that. They braids lay nicely enough to hide the awkward parts.

Since I didn't want to spend all day on this style, I made the braids a little bigger than I normally do. When we were finished, there were 68 braids and it took right around 4 hours with a couple very short breaks to stretch our legs. Once the braids were finished, I added a little Bee Mine Luscious Moisturizer to the ends, which will also curl up more once they get wet. Here was the final result.

We opted to do some box braids, which I'm hoping will last until my health is back at 100%. The braids are also a good choice for right now because the weather here is supposed to be colder, rainy, and windy for a while. Box braids hold up better than most other styles in weather like that.
I started by moisturizing her hair with Curls Creme Brule and then banding it with ouchless bands overnight. Yes, the parts are crazy, but I only used my fingers since I knew the bands were coming out in the morning.

When the bands came down in the morning, we had to leave for church so I put her hair into one big braid. And then I forgot to take a picture of it. Sigh.
When it came time to start the box braids, I started at the back and made my usual crescent shaped parts for her braids. You can click here to see a post that explains this parting method.
When I got to the top, I added a slightly angled side part. This disrupts the uniform crescent shaped parts, but I'm never worried about that. They braids lay nicely enough to hide the awkward parts.

Since I didn't want to spend all day on this style, I made the braids a little bigger than I normally do. When we were finished, there were 68 braids and it took right around 4 hours with a couple very short breaks to stretch our legs. Once the braids were finished, I added a little Bee Mine Luscious Moisturizer to the ends, which will also curl up more once they get wet. Here was the final result.

Tuesday, November 1, 2011
Halloween Hair
Let be start off by apologizing for my absence recently. I've been struggling with some health issues and hair/blogging has been knocked down a few pegs on the priority list. Syd has only been wearing two strand twists and twist outs for the last couple of weeks, but we'll get back to doing more fun hairstyles soon.
And now....on to our Halloween Hairstyle!

Syd dressed up as the Mad Hatter this year. The pictures in this post were taken just before she headed out to a costume party.
Since the Mad Hatter is actually male, I didn't really have a specific hairstyle to try to pull off. I didn't even have a plan when it came time for the style...I just sat down with some bobby pins and started using them.
We began with Syd's standard style, a basic two strand twist out.

I pulled the top back into a standard half up - half down style and secured it with an ouchless band. Then I divided the hair in that band into 4 sections. I twisted each section around itself and pinned them into place. It ended up reminding me a little of a four leaf clover. I then added the top hat just in front of the clover shape, pinning it into place with a few bobby pins.

I have a couple of pink clip-in human hair extensions, so we decided to use those for this style to make it look a little more eclectic. I used Curlformers to curl them, but the extensions didn't have enough time to dry completely and the curls were still much looser than her twist out pattern. One was actually still so damp that it lost almost all the curl within an hour. Oh well...that just added to the fun look.
 She had a blast at the party and her hair held up the entire night, despite the fact that she spent quite a bit of time jumping on a trampoline. Thank goodness I used more bobby pins than I thought I needed!
This costume fits her personality PERFECTLY! I love it!


Got Halloween photos to share? Get the linky code and link up!
And now....on to our Halloween Hairstyle!

Syd dressed up as the Mad Hatter this year. The pictures in this post were taken just before she headed out to a costume party.
Since the Mad Hatter is actually male, I didn't really have a specific hairstyle to try to pull off. I didn't even have a plan when it came time for the style...I just sat down with some bobby pins and started using them.
We began with Syd's standard style, a basic two strand twist out.

I pulled the top back into a standard half up - half down style and secured it with an ouchless band. Then I divided the hair in that band into 4 sections. I twisted each section around itself and pinned them into place. It ended up reminding me a little of a four leaf clover. I then added the top hat just in front of the clover shape, pinning it into place with a few bobby pins.

I have a couple of pink clip-in human hair extensions, so we decided to use those for this style to make it look a little more eclectic. I used Curlformers to curl them, but the extensions didn't have enough time to dry completely and the curls were still much looser than her twist out pattern. One was actually still so damp that it lost almost all the curl within an hour. Oh well...that just added to the fun look.

This costume fits her personality PERFECTLY! I love it!

Got Halloween photos to share? Get the linky code and link up!
Tuesday, October 18, 2011
Changing Big Twists to Little Twists

Syd had worn some thick two strand twists for just a few days, but they were exposed to rain and lots of wind, so they were starting to look pretty rough. The picture below doesn't really seem to show how much fuzz there actually was.

Instead of removing all the twists and doing a whole new style, I opted to change these big frizzy twists into smaller ones.
I did this by removing one twist at a time. After a twist is removed, it leaves behind two tendrils of detangled hair.

I added a bit of Oyin Handmade Burnt Sugar Pomade to each tendril and turned each one into a new, smaller two strand twist.

I removed each big twist on her head one at a time and turned it into two fresh looking twists before moving on to the next one. Here is what it looked like after I had done about a third of her hair. You can see the difference between the bigger twists that looked old and the fresh new smaller twists that looked a lot neater.

Eventually I was done with all of her twists. This was a great way to move from one style to the next without having to fit an entire detangling session in between. And really...you just can't go wrong with a head full of basic two strand twists!

Thursday, October 13, 2011
Syd Gives Herself a Braid Out
By now, Syd has become a pro when it comes to washing and detangling her hair without assistance from Mom. Unfortunately, she's not able to do many styles on her own. We decided to work on that and Syd did a braid out by herself for the first time.
She started by removing her Breast Cancer Awareness style. It had been in for about a week and a half and was very fuzzy. Her hair was still clean and didn't have any build up, so we moved straight from one style to the other without a wash in between.

I told her not to remove the entire style right away. She has a lot of hair and I thought it would be easier to work in sections, so she started by only removing the back section of the style. Then she split the back in half, putting the left part into a big loose braid to keep it out of the way. She focused on the back right section of hair first.

Now I had her divide that section of her hair into fourths again so that there will be four braids made out of this section. Just before braiding each section, she dampened it with a spray bottle and added a bit of Curls Creme Brule. Then she finger detangled, ran her denman through the section to distribute the product evenly, and braided it up. I stressed to her that she needed to start the braid as close to her scalp as possible and keep the braid tight all the way down.

Before long, that back right section was in four braids.

She did the same thing to the back right section and then moved up to the top, where the process was the same.


After what she said felt like forever (although the whole thing took less time than I expected), she put the last braid in.

She slept in those braids and removed them before school the next morning. I didn't get pictures of the removal process. We were a little rushed getting ready for the day, but she got the braids out while keeping most of the definition.

 Since she had a hard time getting some of the braids close to her scalp, her roots were pretty fuzzy. She pulled the front half up, secured it with an ouchless band, and headed off to school.

She started by removing her Breast Cancer Awareness style. It had been in for about a week and a half and was very fuzzy. Her hair was still clean and didn't have any build up, so we moved straight from one style to the other without a wash in between.

I told her not to remove the entire style right away. She has a lot of hair and I thought it would be easier to work in sections, so she started by only removing the back section of the style. Then she split the back in half, putting the left part into a big loose braid to keep it out of the way. She focused on the back right section of hair first.

Now I had her divide that section of her hair into fourths again so that there will be four braids made out of this section. Just before braiding each section, she dampened it with a spray bottle and added a bit of Curls Creme Brule. Then she finger detangled, ran her denman through the section to distribute the product evenly, and braided it up. I stressed to her that she needed to start the braid as close to her scalp as possible and keep the braid tight all the way down.


Before long, that back right section was in four braids.

She did the same thing to the back right section and then moved up to the top, where the process was the same.


After what she said felt like forever (although the whole thing took less time than I expected), she put the last braid in.

She slept in those braids and removed them before school the next morning. I didn't get pictures of the removal process. We were a little rushed getting ready for the day, but she got the braids out while keeping most of the definition.


Braid out success!

Tuesday, October 11, 2011
Rae's Big Haircut for Locks of Love
I'm going to wander a bit from the tween styles and natural hair care issues this site normally features. Instead, I'm going to talk for just a few minutes about myself and another hair-related topic.
I got a haircut yesterday. But this was no ordinary haircut. This haircut resulted in this:
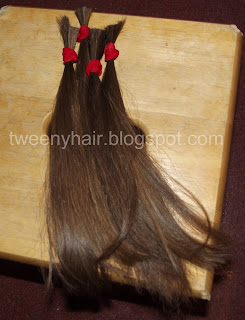
Those four ponytails measure 12 inches each and will be mailed to Locks of Love. Locks of Love is an organization that uses donated hair to create hairpieces for children who are suffering from hair loss due to a medical condition. I made a 13 inch donation a couple of years ago and decided that since my hair had gotten so long again, it was time for another major chop.
Before I headed out the door, my hair looked like this:

When I returned home, my hair looked like this:


I absolutely adore this new look, but I do believe I will be growing my hair out so that I can repeat this whole process again in a couple of years. My hair grows fast, and there are kids out there whose hair isn't growing at all. I can't think of one reason not to help my fast growing hair find a way onto the head where the hair won't grow.
I would also like to mention one more thing. Locks of Love requires a minimum donation of 10 inches of hair. If you have a little less length, but you're ready to donate, there is another organization that might be for you. Pantene Beautiful Lengths accepts hair donations to make hairpieces for women who are fighting cancer and their minimum required length is 8 inches.
Another blogger mommy (and friend of mine) just donated her waist length hair, too. She is the author of the hair blog Girly and Curly. You should definitely go take a look at her new 'do, and be sure to check out the rest of her blog while you're there!
Subscribe to:
Posts (Atom)
LinkWithin
