Monday, January 30, 2012

Short Cornrows, Green Rubber Bands, and Two Strand Twists


After over three weeks of Syd's mini twists, I was ready to get back to some styling. Unfortunately, we didn't have a ton of time, so I had to pick something reasonably quick. I decided to do some short cornrows in the front, with some bright green elastic bands to make it fun. Then I just put the back into our staple...two strand twists.


After a few days with the twists in, Syd removed them to give herself a twist out for a couple more days. Here's how that looked just before the style came down.


This is an age appropriate style that is simple and easy, while still allowing for some variety as the twists become a twist out.

Saturday, January 28, 2012

An Update: Life and the Mini Twists

Hi everyone. I apologize for being gone for a few weeks. Illness and a few other serious life situations made January a fairly rough month for us. But we always bounce back, and I'm happy to say we're ready to get back to life as we know it, which includes a lot more time spent on hair and the blog.

You probably remember Syd's mini twist style I did at the beginning of the month. Those twists lasted about 3 1/2 weeks, but we really didn't get a chance to do any styling. Syd wore her twists down or half-up pretty much every day of those 3 1/2 weeks. I wish they would have lasted a little longer, but Syd wears hoodies a lot during the winter and those hoods aren't very good at preserving hair styles. Her hair was getting very frizzy and I could see the shed hairs making their way out of the twists and causing tangles wherever they went.

Here are a few pics I snapped right before removing the twists. I know what you're probably thinking. There doesn't look like much frizz, right? I agree. But only because these pictures just don't show what I could see in person. There were many tangles to fight during the removal process. Another week wouldn't have been a good thing.


While removing the twists, I detangled with my FINGERS ONLY. A comb would have snapped those tangled hairs and led to a lot of damage. Sure, it took a little longer, but her hair definitely appreciated it!

Wednesday, January 11, 2012

Wordless Wednesday: I can't believe this was 9 years ago!


If you want to link up, feel free! Be sure to grab the code below and add it to your post!

get the InLinkz code

Mini Twists Update

Syd has had her mini twists in for 9 days now and they are holding up wonderfully. We decided to wet her hair about a day after the twists were finished. She likes the look of shrunken twists best, so she achieved that look by simply getting her hair wet and then adding a bit of moisturizer to replace what she had rinsed away. The twists shrank and plumped up, and Syd was happy with the results.

Syd's twists, right after wetting and adding moisturizer


Syd's twists, now dry again. See how her hair looks fuller?

Close up of her now plump twists

She hasn't done much with her hair in the last week. Instead, she has chosen to take a break from thinking about her hair and just wear the twists down most of the time.We did pull the very front back into a half-up style before school this morning, though. Here's what she looked like just before heading out the door.


Syd wears a satin cap to sleep at night to reduce frizz. However, she's been wearing hoodies (with the hood up a lot) now that it's getting colder, so the frizziness is starting to show up. I'm sure we'll start styling the twists more often now in order to keep the twists but hide the frizzies, so be looking for another update before too long!

Thursday, January 5, 2012

Product Review: Blended Beauty (Part 2)


Last month, I posted a review of Blended Beauty products used on a family member's hair (click HERE for that review). And, as promised, I am here to post a review of different Blended Beauty products I used on Syd's hair.

The products I used in this post are:
Blended Cutie Curly Cake Shake
Blended Beauty Happy Nappy Styles
Blended Beauty Curly Frizz Pudding

To start, Syd washed her hair with a clarifying shampoo to remove any product residue that may have been in her hair. I then sprayed her hair with Curly Cake Shake and used my fingers, then a wide tooth comb to detangle her hair in sections. I braided each section to keep it detangled until I was ready to style.


*Curly Cake Shake is a moisturizing detangling lotion in a spray bottle. It left Syd's hair feeling moisturized and added enough slip to make detangling a breeze.

I decided to define her curls by working with one braided section at a time. I started in the back, and removed one braid. Since it had started to dry, I sprayed it with water to get the section wet again.


Once the hair was completely wet, I added a generous amount of Happy Nappy Styles and used a Denman to distribute the product evenly through that entire section of hair. Then I topped that with some Curly Frizz Pudding, again using a Denman to make sure all the hair was coated.


My next step was to define the curls. I did this by smoothing each individual curl from root to tip, twirling it around my finger as I went. The picture below shows the amount of hair in each curl I was defining.


I continued until the entire section consisted of curls that were clumped together and defined.


I moved on to the next braided section and repeated the whole process, working from the back of her head and moving forward.

Below are pictures of her hair right after the styling was finished. You can still see a bit of the product, but that disappeared as soon as it started to dry.


At the end of the day, her hair was dry and she had a head full of curls that were soft and well defined.


Final thoughts:
Blended Beauty worked like a charm. The combination of Happy Nappy Styles and Curly Frizz Pudding offered the right amount of moisture, weight, and hold to make Syd's hair look great without feeling greasy. And I was very pleased that none of these products made Syd's hair feel the slightest bit crunchy, which is something that Syd and I both dislike.

After trying two sets of Blended Beauty products on two different heads of hair, I can honestly recommend this product line for all types of curls. Be sure to visit blendedbeauty.com, where you can discover their wide range of products and even use their tools to help find the perfect product combination for your curls.

* Note - These products were provided by Blended Beauty for review and at no charge. The opinions expressed are my opinions based on my personal experience.

Wednesday, January 4, 2012

Wordless Wednesday: Silly String Graffiti


If you want to link up, feel free to use the link below to grab the code, add it to your post, and add your name to the list!

get the InLinkz code

Tuesday, January 3, 2012

Many Mini Twists


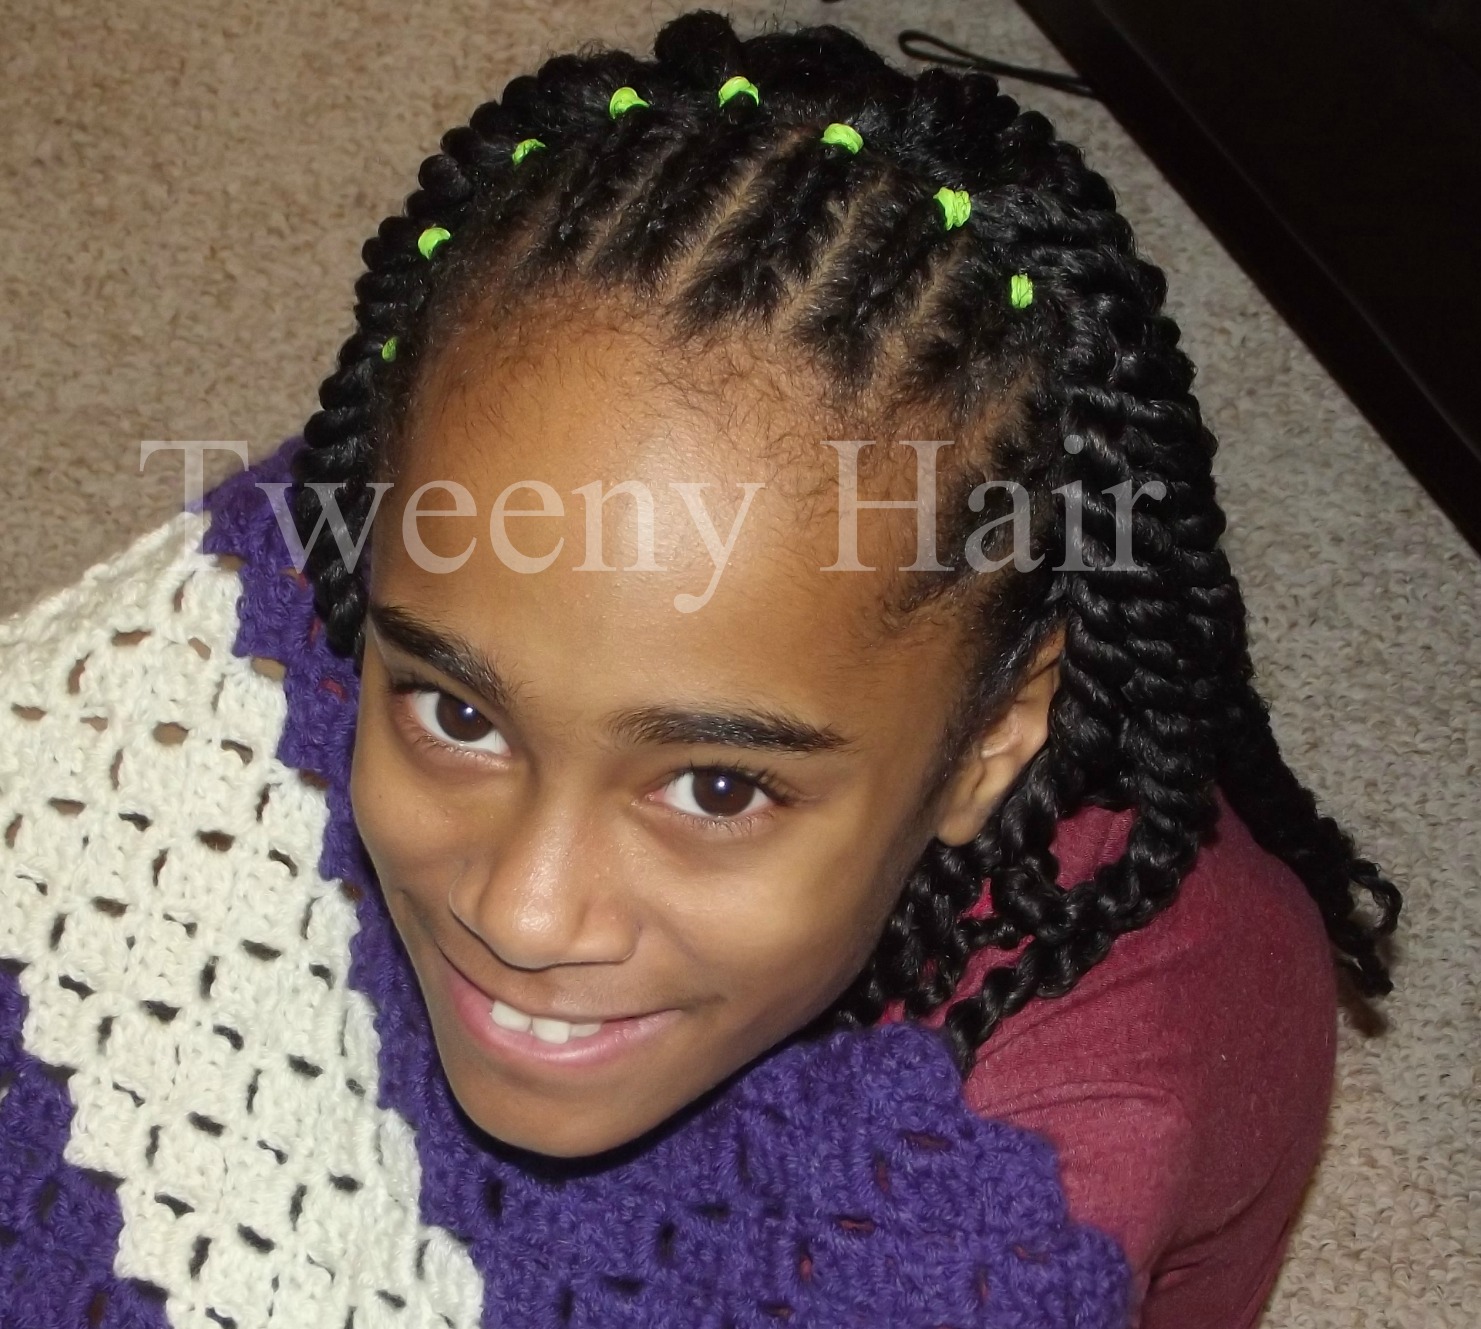
Syd and I decided to use the long holiday weekend to give her a head full of small twists. Since it takes so many hours to finish the style, we used a slightly different method to do these twists so that we could hide the half-finished state of her hair if we needed to. Here's how we did it.

We started out by having her hair washed, detangled, moisturized (Bee Mine Luscious Moisturizer), and put into 30 braids. As I turned each braid into twists, I added just a bit of Miss Jessie's curly pudding for some extra hold.


Each of those braids was turned into 6 twists, with the exception of the braids at her crown. Several of those were turned into 9 twists because her hair is so much thicker right there. Below, you can see the step by step process of turning one braid into 6 twists.


In order to make it possible to hide the half-finished state of her hair, I started the twists at the back of her head, then moved up to the very front.


Once the braids around the perimeter of her her head were transformed into twists, we took a break. I pulled all of her hair into a ponytail and the braids were covered by the twists. Although she didn't have anywhere to go, she could have easily worn this ponytail to school, if she needed to. Some of the braids were peeking through just a bit, but it wasn't very noticeable and still looked ok to wear as an everyday style until the twists could be finished.


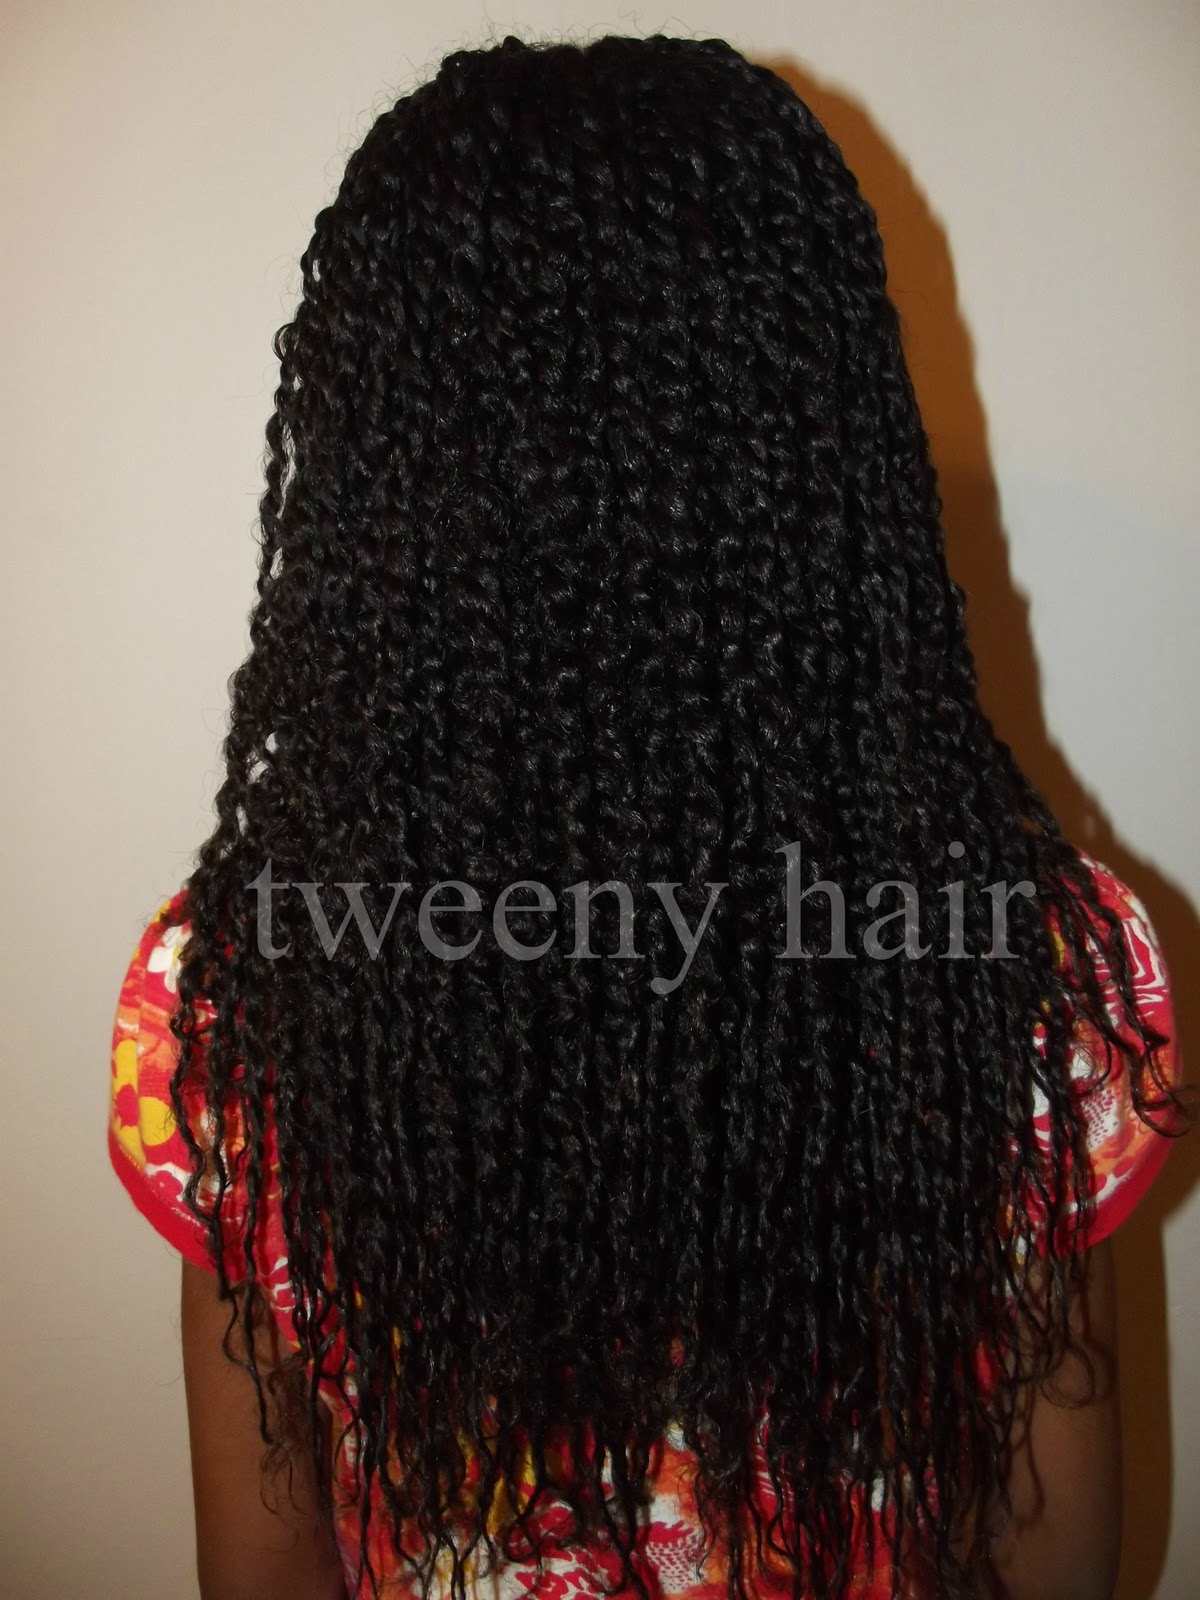
A while later, we finished the twists. The actual styling time was just over 6 hours and we had right at 200 twists.


You can see here just how thick her hair is and how many twists there actually are on her head.


When it was time for bed, I pulled her hair into a ponytail and wrapped a satin hood-style scarf around her head, with the ponytail hanging out the back. She also slept on a satin pillow case to preserve the twists as much as possible.


Syd will probably wet her hair today. She likes the look of mini twists after they shrink because she says they look fuller. Go figure, the girl who loves big hair wants the twists to look as full as possible. I guess that shouldn't surprise me, huh?

Stay tuned for pictures of her shrunken twists, updates about how they hold up over the next couple of weeks, and pictures of the different styles she wears with them!

Sunday, January 1, 2012

Hair Carnival: Curlformers!


We're participating in another Hair Carnival this month. The topic of this particular carnival is Curlformers, and there's even a giveaway!

We love our Curlformers! We have the extra long and wide ones and have used them many times. Instead of doing a new style right now, I'm going to post pictures of Curlformers styles we've done in the past. If you've been reading the blog for a while, some of these pictures may look a little familair. If the picture is from a previous post here on Tweeny Hair, I'll leave you a link to the original post.


Click HERE for the original post

Click HERE for original post

Click HERE for original post
Look for more of this style in an upcoming review post!

See why I love those Curlformers? It's a guaranteed way to get perfect curls every time!

Be sure to enter the Curlformers giveaway after visiting all the carnival posts. To enter the giveaway, you will need to collect secret letters from each blog. Tweeny Hair's letter is:


LinkWithin

Related Posts Plugin for WordPress, Blogger...